Welcome to what may seem to be a pretty random blog - it won't be all (or probably even mainly!) about photography, but more about our interests, things we've learnt and other stuff!
Our lives are pretty well filled with doing "stuff" - we very much enjoy the outdoors (unless it's raining heavily) and we are often gardening, fishing or doing other "outdoors" stuff. We also can end up working on our land rovers - currently a Series 3 Diesel and a 300TDi 90 - as they need some loving after a hard life!
When the weather is miserable (or the tides are wrong for fishing) we may end up indoors. The XBox is a great temptation and so is card making and crafting! Of course, there is always a pressure stove or lamp that needs polishing or playing with too!
For those of you that are interested in classic pressure stoves and lamps, there will be some information and thoughts :)
NOTE: Word usage is (mostly) in accordance with Proper English (i.e. not American english) so gas = gas and not petrol. Paraffin = Kerosine etc.
To clean a stove
When you're ready to get stuck in with the proper cleaning of your stove, remember to never use wire wool*, scouring pads*, sandpaper, scraper or brasso. Seriously, people have used such things and marred their stoves beyond visual recovery... Brasso is a hidden ill - it seems like the perfect cleaning solution, however it contains ammonia which has been noted to make the particular brass that these stoves are made of susceptible to stress cracking (which is very bad).
*Sometimes, and for certain parts of the stove, you may want to use these, albeit with great care & in a "safe" manner.
Now, with a mild soapy solution/detergent, clean the stove carefully (don't use anything that is too abrasive - you may get away with an old & worn non stick safe scourer, or you may not...). You might have areas of green on the brass (verdigris) which you can either treat with strips of kitchen paper soaked in distilled vinegar or with BarKeepers Friend (follow the instructions!).
You've already cleaned the inside of the tank out if you followed the last post, but if not, go to the last post to find out how you can do it!
Now you can polish the tank up with Begom Alu or Autosol (or similar) and a soft lint free cloth. If you don't want your fingers getting black (and I do mean black) then wear cotton, nitrile or latex gloves when doing this. No it's not kinky, it just stops you looking like a coal miner at work the next day.
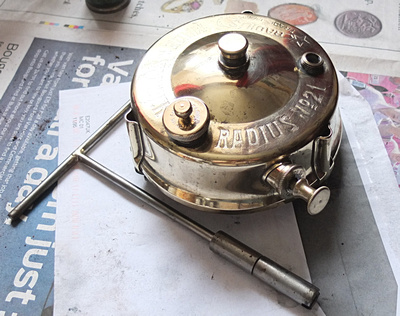

Polished tank with an NRV removal tool in front.
So far so good - after a few hours work, the tank is nice and shiny. What about the burner though? This will be coated in soot and isn't going to be particularly nice to clean...
You are going to need replacement heat-proof washers after following the next step.
Separate the burner assembly from the riser tube and spirit cup. Note the order of disassembly and where the various heat-proof washers are.
 The riser tube will clean nicely as the tank did. The spirit cup may need a little extra work - start to work on the black bits with the previously used non-stick safe scourer and if that doesn't work, use the finest wire wool that can be got (I think it's 000 or 0000). For the burner head I suggest that some work with a scourer (the burner is a harder alloy than the tank so isn't going to scratch as easily) and a weak detergent solution will help get the worst off. Other useful tools here include a small brass wire brush to clean the burner.
You will need a special tool for the next stage.
To clean the inside of the burner, we need a purpose made nipple removal tool (a pointer here - some of the available tools on e-bay may not fit the nipple - don't force it, either file out the tool, or get one from base-camp.co.uk). We need to remove the nipple (keeping it safe) and then either soak the burner in a weak solution of caustic soda to remove the carbon from inside (NOT recommended as it is EVIL stuff!) or we heat the burner (don't do this inside) with a blow torch until the colour changes (don't heat it cherry red!!!) and plunge it into a bucket of cold water. Empty the burner of water and repeat this until the carbon stops coming out of the burner (3 or 4 times usually). Now metal gets HOT when heated! Use mole grips or similar to hold the burner by the "nut" when you do this and maybe wear gloves. When done, blow through from the bottom of the burner (wait until it's cold!) and it should now be clear :)
You will now need to remove the remains of the heat proof washer from the burner (that sits on top of the spirit cup) and off the spirit cup. You may need to use a jewellers screwdriver carefully to assist in removing all traces (without scratching the metal) and ensuring that the "groove" is clear. Be careful as these are sometimes asbestos based. If you are worried, clean the washer off under water with a suitable tool.
You can now warm the burner (if you want) and soak the burner in distilled vinegar for around 15 minutes to help in final cleaning. Rinse off (and through) well with cold water (if you can pump high pressure air or water through the burner to remove any last bits of carbon, do so!) and polish the burner with whatever you're using.
The nipple can now be replaced by a new one or the old one cleaned up and the jet orfice pricked (with the correct pricker) and can be installed in the burner (take care not to cross thread it as this will ruin the burner!). Yes this step is annoying. And time consuming. The easiest way is to use a little blu-tack to hold the nipple in the tool (to stop it falling out) and to turn the nipple antil-clockwise to start with (it helps it "locate") and then tighten it up slowly and carefully...
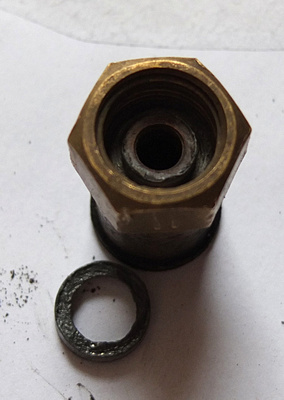
Base of riser tube & lead washer
There is a lead washer in the base of the riser tube (on the part that screws onto the tank) for most stoves. This may need to be removed and replaced. Re-assemble the burner ensuring that there is a heatproof washer above the spirit cup (and sometimes one below - you did make a note of how it came apart?). Tighten up using spanners NOT pliers and ONLY grip the nuts. Don't overtighten.
All well and good! Your stove should be nice & shiny and your burner should be ready for use. But what about the other washers & seals?
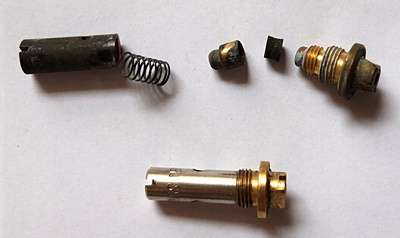
The pump washer will probably need replacing. Sefaudi on e-bay does awesome pump washers and he comes HIGHLY recommended.

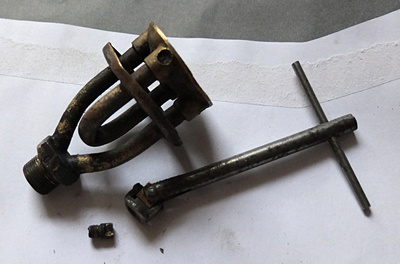
Please refer to the above photo. You can see the old pump washer in front of the pump shaft and other components. The small nut holds the pump washer on the end and the brass threaded collar holds the pump washer. The large nut screws onto the brass collar and the nut goes inside the pump washer (common sense!). The whole assemble slids onto the narrower bit of the pump shaft with the open end of the washer towards the end (i.e. where the little nut goes). Soak the pump washer in oil for a good long while (overnight, or longer if possible) - remember, not vegetable oil!
Replace the washer in the fill cap - the old one may need to be broken out using a jewellers screwdriver.
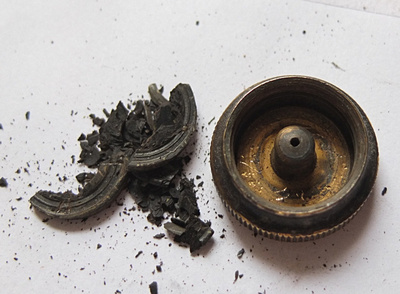
If you get the dreaded "Viagra Effect" when pressurising the tank, the NRV (inside the pump tube) may need to be removed to have the "pip" replaced. There may be a washer in the bottom of the pump tube for the NRV which may need replacing too.
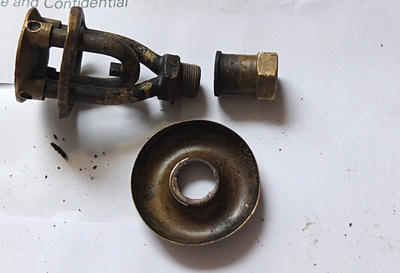
 A complete NRV with a disassembled one above. The springs break and weaken and may need replacing. The brass cup holds the pip (which may need to be dug out). Service the NRV and replace.
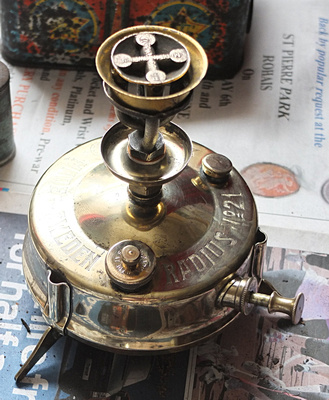
Once all the seals have been replaced and it all cleaned, it should look a bit like this. This is the same stove from the previous post.
Prime the stove
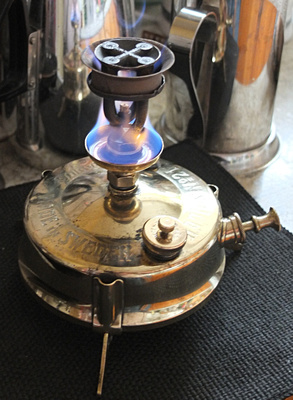 And add pressure as the meths is almost all burnt off
 If the flame tips are very yellow (or the flame is all to one side of the burner) you will need a new nipple as the old jet is either damaged or too worn.
 A little yellow in the tips is fine and usually goes away with a pan on top. Now you can add the pan supports and use your stove!
So you have a stove...
If you've managed to pick up a nice brass pressure stove, what next?
All the following information is available on the Classic Camp Stoves forum. Please feel free to search there for hints & tips and stuff. It is, afterall, where I picked up most of the things I know!!!
Furst First we'll give the stove a gentle clean with a mild detergent (like fairy liquid) and gently clean the stove with something similar to a non-stick safe scouring pad or sponge - you just want to clean the worst of the grot off so you can handle it! You should find that a lot of the muck will clean right off. Take care not to scratch the brass any more than it is already.
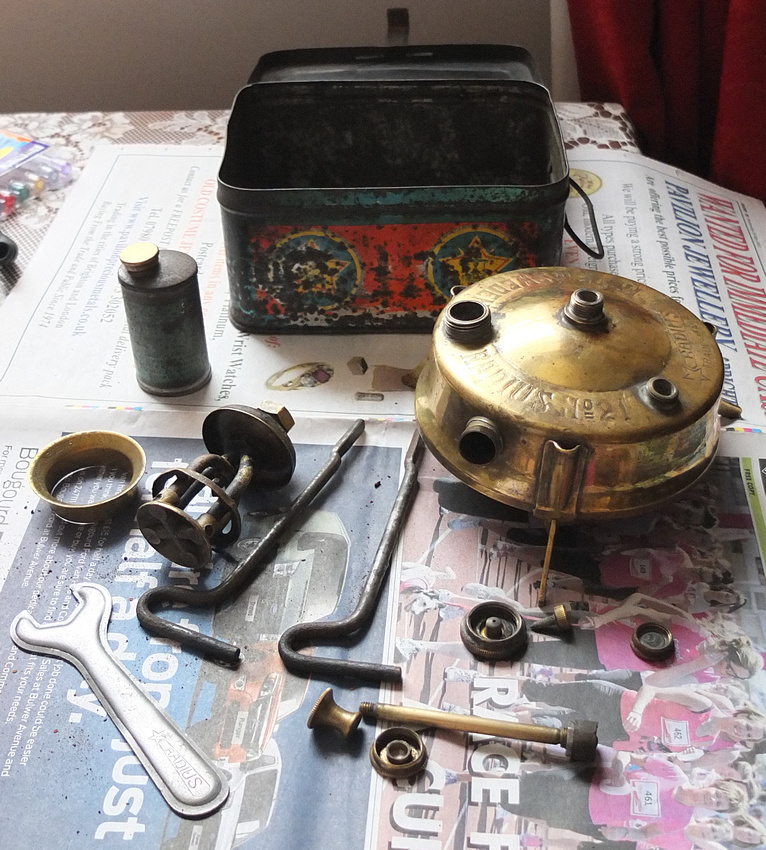 We have here from top left, spirit can (this woud be for meths), storage tin, cleaned tank. From middle left, flame ring, burner assembly, pot stands (only two - there should be three), fill cap, pressure release screw, reserve lid. From bottom left, spanner (for attaching & removing burner) and pump assembly, pump knob, pump cap and pump shaft complete with washer. Newspaper is a MUST - do not anger the domestic authorities!!!
What we want to do now is see if the tank holds pressure. Unscrew the pump tube cap and pull the plunger out slowly. Hopefully, you will find an old pump leather still intact (or even better, a newish one in good condition!). Soak the leather in some three-in-one oil or motor oil until it's supple and replace the pump. Now tighten down the fill cap and pressure release screw and put your finger over where burner screws onto the tank. Pump the pump! You should feel resistance and you should feel air trying to push your finger off the top of the tank. Now submerge the tank in water (still with your finger on top) and watch for bubbles!
Watch for
- Pump knob not moving when you pump - this suggests a stuck NRV (non return valve)
- Pump knob & shaft sliding back out of the pump tube ("Viagra Effect") - this indicates an issue with the NRV
- Bubble from pump tube - this indicates an issue with the NRV
- Bubbles from the fill cap - this is just a straight forwards seal to change
- Bubbles from elsewhere - hope that they're tracking or your finger is loose on the top of the tank as otherwise, you're going to get good at soldering brass...
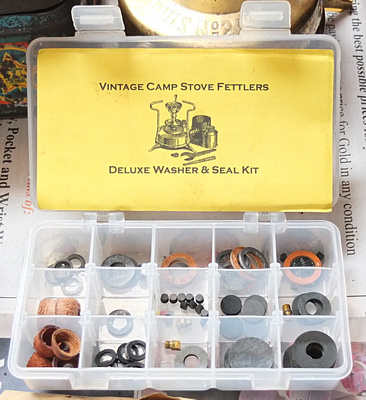
As a guide, expect to replace every seal in the stove when you rebuild it, including the pump leather. Thankfully, kits are readily available from http://www.fettlebox.co.uk/ but you may find yourself popping over to base-camp.co.uk for other parts.
 Ok, so lets assume that the tank holds pressure. Now you want to clean the inside of the tank out well with a warm weak soapy water (some use soda crystals in solution) and clean the accumulated cr*p out of the tank. Rinse well with hot water & let to dry. Rinse the stove out with isopropyl alcohol (or similar) and dry.
Now attach the burner to the tank and snug it down and pump! You're going to listen for the air coming out of the jet of the burner (you can always put this bit in water and watch for results). If no air comes out, you are either going to need to replace the jet (or prick it out with the corret size pricker) and/or clean the burner assembly.
If the burner isn't blocked you can put some paraffin in the stove and do a trial burn. Don't fill more than 1/4 full at this point. Never do your first burn of a new stove indoors or near flammable stuff and NEVER USE PETROL IN A PARAFFIN STOVE!!!
Ok, to do a test firing, make sure the stove is in a draught free place. Close the fill cap well BY HAND ONLY and open the pressure relief screw. Fill the spirit cup with meths (don't fill it right to the top) and always ALWAYS mop up spillages. Light the meths in the spirit cup and wait! As the meths burns down to the bottom of the spirit cup, tighten the pressure relief screw. If you have a silent burner wait for the meths to extinguish. If you have a roarer burner, pump the stove up until you get ignition! If you get a jet of liquid paraffin, stop pumping, release the pressure (using the pressure relief screw) and re-prime with meths. With a silent burner, pressurise the stove with a lighter near the cap so it burns outside of the cap (just like with a gas stove).
Now hopefully you have a good (blue) flame from your stove. Watch and see if the flame dies down quickly (indicating a pressure leak) or continues strongly. Watch for a yellow flame coming from anywhere it shouldn't and also look for white vapour escaping from anywhere
If the flame does die down, let out the pressure and wait for it all to cool. Nothing should be warm. Empty the paraffin into an old coke bottle and then pressurise the stove again, block the jet of the burner with your little finger (or something that isn't going to get stuck in the jet) and place stove under water to look for leaks. It's hopefully just a lead washer or one of the seals around the spirit cup that needs changing.
If you didn't get to do the trial burn, don't worry! Part of the fun with old stoves is getting them going and cleaning them up!
Cleaning full service next ;)
No case?
Ok, we have a stove with no case?
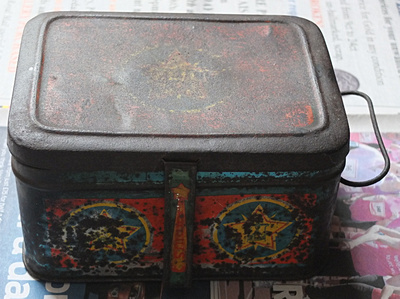
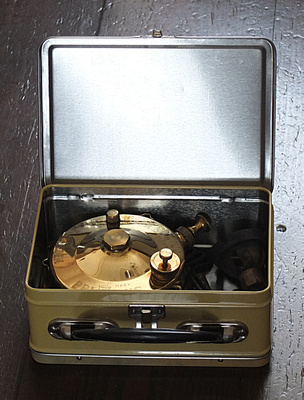
This shouldn't be a problem! Let me show you the tins that two of our 96 type stoves came in.
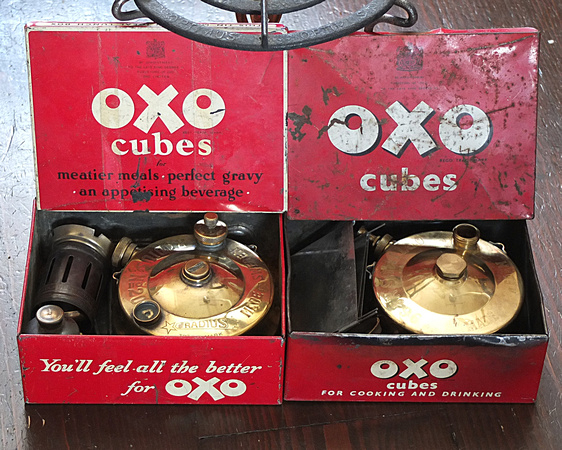 Yup, OXO. The best bit is that on the side of one of the lids it says "Perfect as a Lunch Box". See, people back then were smart and knew how to re-use and re-purpose things. And packaging didn't just create landfill. Perhaps, as a society we could learn from them?!
I doubt that you'll be lucky enough to come across lots of oxo tins though. Thankfully, Amazon has an answer.
 A small child's lunchbox! Dimensions ARE important as otherwise you won't close the lid...
Or let's check the army & navy store.
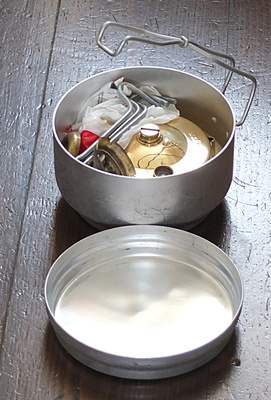 Or for a larger stove (an 00 size in this instance), a Zebra Head stainless billy can.
 What can you find for yours? A Dr Who themed box from HMV? Let us know ;)
Report from the Bay of Evil
A quick report from a cruise of the dangerous waters of the Bay of Evil.
Various classic camp stoves in various states of repair or completeness have been sighted!
Unfortunately, there aren't as many bargins at present as there used to be - hopefully that'll change as the camping season closes and winter starts.
A brief report of the skirmish follows:
- Optimus 111 (embossed case, so an older model) either a Kerosine or Petrol model, missing filler cap and case rusty. £22
- SVEA 121 stove, later model. £28
- Primus 96, older model, not perfect condition, but original tin in reasonable condition. £16 [The buyer got an absolute bargin!]
- Primus 96, later model, pretty good condition, tin not original. £33
- Monitor Touring Stove equivalent to Primus 96, missing some parts. £15
- Primus 96, missing flame plate. £24
- Veritas 2 pint collapsible stove. Unsold. Start price £30 [IMHO asking about £10 too high!]
- Optimus 45 1 3/4 pint stove. Later model. Reserve not met. Bid @ £26. [Reserve price too high - seller desperate for cash or has too high expectations IMO]
- Really nice Radius 21 in original tin. £23.01 [a REAL bargin!]
There are still stoves out there! Find a stove that is complete, even if it's grotty (as long as it's not dented or badly scratched) and work out how much you are willing to pay for it!
Look out for these makes which may be cheaper - don't be tempted to pay over the odds unless you REALLY want it!
- Veritas
- Parasene
- RM [don't be fobbed of by sellers claiming it's a "Primus" - it's a Primus type NOT a Primus stove and is not as good quality IMHO]
- Burmos [can have poor quality control so beware!]
- Monitor
- Buflam
- Valor
Other Manufacturers
- Primus
- Optimus
- Radius
- SVEA
- Thermidor
- Coleman
- MEVA
- Hipolito
I encourage you to do your own research before bidding!
Loud or Quiet?
What is it about youngsters that they seem to think that anything "loud" is good? Loud exhaust pipes on standard cars (the ubiquitous "Fart Cannon") or on modern two-stroke scooters/motorcycles. Loud can be annoying - especially when it's an annoying noise that's loud!
Now if it is the sonorous tones of an old V8 or a classic car/motorcycle that is loud, it can be pure music to the discerning ear (even if it isn't to your neighbour at 06:00 in the morning...).
Now lets consider the effect of relative silence. All sounds appear magnified - a sound that is barely audible in the day is REALLY loud at night - you can even hear snails munching their way through your herb garden at night!
A perfect example of this is one of our cats (that is sadly no more) had issues with the cat flap and patience, if his magnet didn't release the cat flap in time he'd resort to the tried and tested method of battering it down with his paws to get in. This would usually work as either the cat flap would be forced open or we'd hear the noise and open the door for him! This may be considered to be spoiling your cat but that little fella was smart enough to pick up something in the garden and use it as a battering ram - just glad cats don't have opposable thumbs... He eventually got the hang of the "wait for the click" business and things calmed down - until (there's always an UNTIL isn't there?) one morning, although it was technically morning it most certainly didn't feel like it(!), at 02:00 we were woken up by the sound of an almighty BANG followed by a succession of equally loud BANGs. It was just as if the little swine had finally found a battering ram and was playing "storm the keep". Except it wasn't (of course!) but just in the still morning (technically) air when no sound was around, the noise made by a little cat's paws on a plastic cat flap was magnified to horrendous proportions. And it echoed. Boy did it echo. (Sorry neighbours - again!). I'm not sure what was louder, the human in a haze of sleep and desperately wanting to return to the nice warm comfortable bed stumbling around and walking into everything to get downstairs to open the door for the (now) happy and VERY friendly cat, or the original racket!
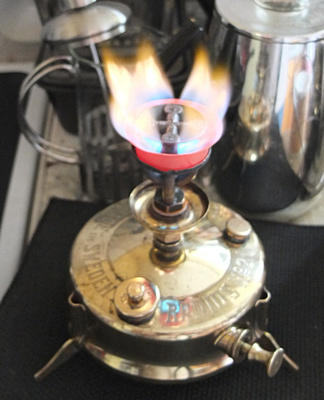
What does this have to do with stoves? The traditional burner on a (proper) stove is called a roarer burner...
Yup. In an enclosed space they are NOT quiet. At unseemly o'clock on a campsite they are also going to be noisier. Thankfully, it's easy enough to "gag" it - first put a windscreen around it then put the kettle on! Actually using the stove is going to cut out a lot of noise :) Just don't put the whistle on the kettle at night eh? ;) Depending on the campsite you may (of course) not want to muffle the stove...! It is a pleasant noise though, unlike some nocturnal sounds...
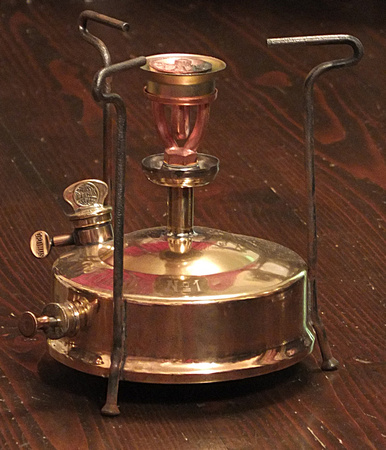
Optimus No. 1 stove with roarer burner
 There are silent burners available although they are mostly to be found on the larger (basecamp) stoves as they are very sensitive to wind, both in the priming stage and in use. If one is clever one could create a hybrid, using a silent burner on a 1 pint stove. Or one could use one of the Coleman stoves (or a gas stove). Or better still, you could just be smart about where and when you brew up! Remember that although sound carries REALLY well at night, your stove is still going to be quieter outside than if you were using it in your garage as you don't have four walls and a roof to contain the noise :)
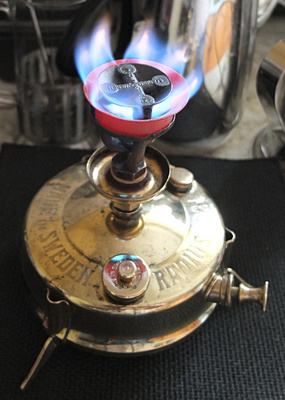
Primus No. 10 stove with silent burner
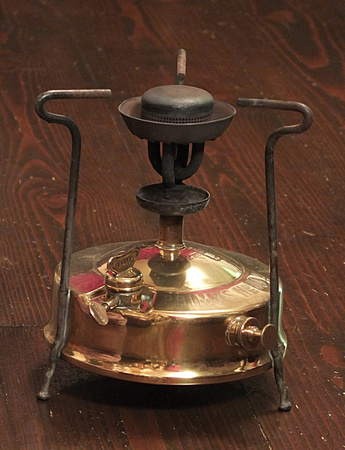 Notice the difference between the two burner heads? With the roarer burner you get four "sheets" of flame which gives you the noise, on the silent burner, you have lots of little "flamelets" (like on a gas stove).
You might have already guessed that even if a silent burner isn't the best for use outdoors, it is ideally suited to use indoors! Yes, that's right, indoors! Perfectly safe, just need to exercise caution with the priming phase and make sure that any reflected heat (or heat transferred through the legs isn't affecting the surface it's on - yes, the COMMON SENSE rule applies here - don't put it on anything that might catch fire!
Oh, even if you aren't using your stove at night, please do remember that ALL SOUND CARRIES REALLY WELL AT NIGHT. If you're on the same camp site as us and you disturb our sleep...
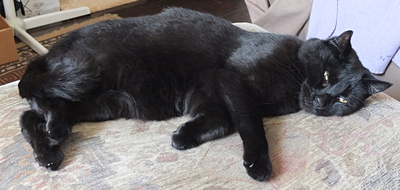
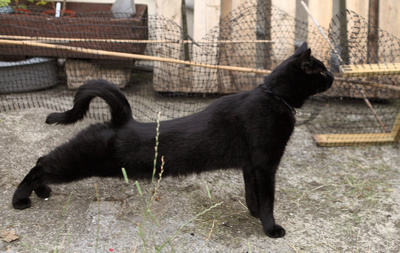
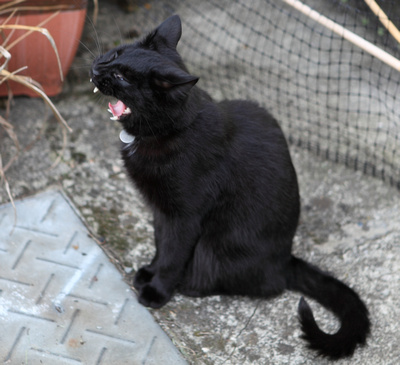
Obligatory animal/cute pic follows. No it didn't get turned into lunch either as we didn't have the air rifle handy, it just got shot with a camera instead ;)